
We love, love, love making prezzies feel super special here at Jungalow, evidenced by so many fun wrapping ideas we’ve shared over the years. And some exciting news, we’ve just launched our brand new eco-friendly gift wrap sets in the shop! Not only are these guys nifty ’cause of their reversible sheets featuring two of our festive signature patterns, but they’re also printed in the USA with soy-based inks on recycled & recyclable newsprint – you can even toss them in the compost bin if you’d like (we like)!!
As long as we’re being eco-minded, we thought we’d use all those little scraps ’til they’re gone! Check out a couple of our ideas for how to utilize every last piece of your gift wrap kit (which comes with 5 large sheets, 5 assorted gift tags stickers and a paper Hamsa tassel gift tag/ornament BTW).
We’ve got some fun DIY gift wrapping tutorials for you below!
First up? Wrap Your Bouquet!
Need a last-minute hostess prezzie? Go into your yard (our walk around your block) and forage some pretty greenery! Then check out the nifty GIF-y below and the instructions to see how to wrap it:

Wrap Your Bouquet:
What ya need:
- Flowers or greenery
- 1 sheet of Jungalicious gift wrap & coordinating gift tag sticker
- Ribbon or twine
- Scissors
- Tape (we used double-stick here)
What to do:
- Start by creating a cute lil bouquet! You can forage flowers or greenery from around your ‘hood, grab some from your local florist, or even pick up a small bunch or two from your grocery store and mix & match with those. Once you have your arrangement, it helps to secure with a rubber band or twine to keep it all in place.
- Use a large, square scrap of gift wrap (bonus points if it’s reversible!), lay down your bouquet and align the top of the flowers/greenery with the top left corner of the sheet. Your bouquet should lay diagonally across the square going from the top left corner down to the bottom right corner.
- Time to fold! Bring the bottom right corner all the way up to the middle of the bouquet and make a crease. Then, bring the top right corner and bottom left corner almost all the way to the center and crease those, too.
- Now, more folding! Bring your newly folded bottom right corner and fold that piece all the way in until it aligns with the left edge of your center fold. Add some tape (double-stick works well!) to secure it in place. You’ll then bring the newly folded bottom left corner and pull it tight until you reach the right edge of your new bouquet. Don’t forget to tape to secure it into place, too. At this point, your paper should look like a bouquet – yay!
- Then comes the ribbon! Pick & choose your fave ribbons – we went for a sage velvet layered with a natural/copper twine. Wrap it around your bouquet, leaving room to tie a knot or bow in the front, and cut accordingly. We left enough to go around the back first, then bring the pieces up toward the front & tie into a decorative knot. Either way works!
- Secure your knot or bow and cinch tightly around the bouquet stems to prevent the bouquet from slipping out. Trim the edges of the ribbon to your liking, we kept ’em pretty short & sweet for this one.
- For the finishing touch, add your jungalicious gift tag sticker and write a lil message to your homie. Now you’re all done & your bouquet is ready to go!
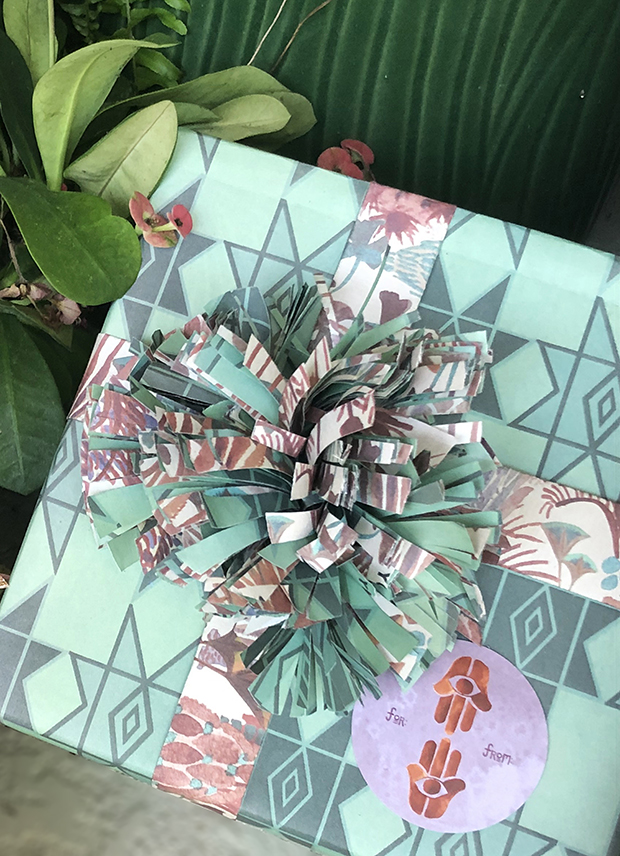
DIY Paper Pom Pom
Another fun, no-waste idea is to use your wrapping scraps as ribbon and a gift topper. We were mid gift wrap when we noticed a long, skinny scrap that reminded us of ribbon. Next thing you know, our new paper ribbon idea was born and we haven’t looked back since! Check out our steps below for how to create your own paper ribbon & pom pom toppers.

PAPER POM POM + RIBBON DIY:
What ya need:
- Wrapping paper or scraps (we used scraps from our reversible sheets!)
- Scissors
- Tape (we used double-stick here, too)
- A wrapped gift to put these on
What to do:
- First, wrap your gift! Save your scraps!
- Take a long, skinny scrap and fold in the two long edges to create your ribbon. Adhere to the gift box using double stick tape. We used two separate pieces of paper ribbon to do the criss-cross look and adhered them all at the bottom of the box.
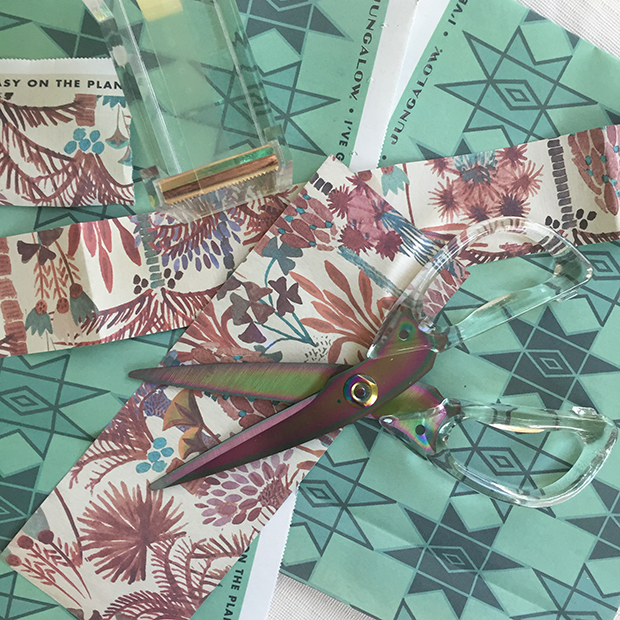
- Now, for the pom pom! Pick a paper scrap and fold it a few times resulting in a ~5″ square shape.
- Then, hold the bottom left corner while cutting from the bottom right corner up to the top left corner making a rounded shape.
- Start cutting from the rounded edges almost all the way to the fold – this is what makes all of your pom pom shreds! (Don’t cut all the way to the edge, remember to leave a little space!)
- Once you’re finished cutting, unfold once so you have a long folded edge along the bottom and your rounded, shredded edges along the top and sides.
- Start folding the pom pom in a zig-zag pattern to make it voluminous and extra festive. When you’re finished, secure with tape. You can give the edges a little trim so that they all feel about the same length.
- The fun part – holding the base of the pom pom, shake it out to get the paper to separate and create your pom pom effect. This works wonderfully with reversible paper so that it’s patterned no matter which side it is!
- Add some tape (double-stick works best) to the bottom, and stick your pom pom to the paper ribbon! Sometimes it helps to fold the bottom of the pom pom down to make a flat edge, too. Now, you’re ready to rock & roll with your new eco-friendly gift wrap!
Got any more innovative ways to wrap with scraps? We’d love to hear ’em! Also, you can pick up the same wrapping we used right here in the shop. Happy wrapping, y’all!
Photography by Kelly Greenwood for Jungalow®.
Everything looks so beautiful! Those scissors!!! They are gorgeous. May I ask, where are they from?
Thanks, Lisa! They are an older pair, but the maker is Farberware.
Thank you so much! :)
You are very creative!
I am all about the wrap, so this is just perfect for me. Thanks for the inspiration!
Fun DIY gift wrapping tutorials!
Then there’s the ribbon! Choose your favorite ribbons – we used sage velvet covered with natural/copper thread. Wrap it around your bouquet, allowing enough area in the front to tie a knot or bow, and cut accordingly.
Your bouquet is very beautiful. You are the corner of your hand.
Your bouquet is very beautiful. You are the corner of your hand.
Thanks for sharing this blog with us.
I will try these, nice gift wrapping thanks for the inspiration
It’s so simple. But very unique. So great
fnf games are a form of interactive entertainment that is based on a fictional world. They have rules, systems, and storylines that are different from traditional video games.
The popularity of fnf games has increased over the past few years. They have been especially popular among millennials and young adults who often prefer to play these types of games instead of traditional video games.
A lot of studies show that fnf game players tend to be more creative than their counterparts who play traditional video games.
Awesome and interesting article. Great things you’ve always shared with us. Thanks. Just continue composing this kind of post.
Are you looking best online gambling site for earn money online from home or anywhere. Which site provide the Indian satta, Indian matka, madhur matka, these kind of games for earn money? There are many sites for play the satta matka online. If you want to play and earn money online so contact us, we provide the best gambling service for earn money. Visit our website and get the earn start money. Visit our website at: https://indiansatta.net
If you are play the satta online for earn money. so there are many websites for earn money but all are not trusted sites, only some sites are trusted. But you need to choose the best site for play Indian matka satta online. Indian satta is provide the Indian matka gambling game. Visit our website. Visit our website at: https://indiansatta.net/
Madhur Matka is the best platform for earn money online. Did you hear about Madhur Matka? if you didn’t hear about online gambling so don’t worry. We tell you which type of website provide the sports betting, and how to earn money online. Visit our website and earn money online. Visit our website at: https://indiansatta.net/
Your work is really good and I appreciate this information. I forever prefer to read quality and glad I found this thing in your post. Thank you for the comprehensive article.
The method is incredibly original and unusual, and I am quite excited to share it with everyone.
This is a wonderful Blog!! I loved reading it. Thanks for sharing all these information, it’s so appreciated! wendyswantstoknow
I loved reading it. Thanks for sharing all these information, it’s so appreciated! Tesco Views Survey
so beautiful, i want it too
Podlix Funky Republic TI7000 Flavors are a cutting-edge line of electronic vaporizers designed for users seeking a sleek and user-friendly vaping experience. Crafted with precision and style, these devices offer a perfect blend of form and function. With a focus on simplicity, Podlix Funky Republic TI7000 Flavors feature easy-to-use controls, ensuring both novices and seasoned vapers can enjoy a hassle-free experience.Equipped with advanced technology, Podlix Funky Republic TI7000 Flavors deliver a smooth and satisfying vapor production, allowing users to customize their nicotine intake and flavor preferences. The compact design makes them portable and convenient for on-the-go use, while the rechargeable batteries ensure long-lasting performance.Podlix Funky Republic TI7000 Flavors also stand out with their diverse range of flavors, providing a delightful array of options to suit individual tastes. Whether you’re a fan of classic tobacco, refreshing menthol, or indulgent dessert flavors, Podlix Funky Republic TI7000 Flavors cater to a wide spectrum of preferences.In summary, Podlix Funky Republic TI7000 Flavors offer a blend of style, functionality, and flavor diversity, making them an ideal choice for those seeking a reliable and enjoyable vaping experience.
Go into your yard (our walk around your block) and forage some pretty greenery!
I never knew about this information! very useful information